


To the right you will see a photo of the Denver Broncos scarf I designed based off of putting the images in KnitPro and adding them to the scarf using the duplicate stitches technique-- the horse head at one end and the word "BRONCOS" at the other end (when "Broncos" end is put over shoulder, it reads across ^_^). The body of the scarf is knit in the round (16" size 8 circular needles, cast on 60 sts, knit around until desired length) then add the logo and word using duplicate stitches (I had to work with my graph to get it to look right), tie off all your loose strands (these will be nicely hidden since it is done in the round), then sew up ends. Make sure you start as centered as possible so that the two ends line up appropriately. The logos are owned by the Denver Broncos -- selling is against copyright laws. But they make fabulous gifts.
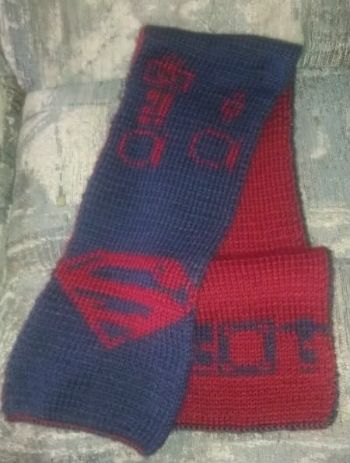
To the left is a Superman scarf with the Superman logo plus "Kal-El" in Kryptonian (and also the name "Tom" since that is the person's name
who I made it for). I used the double-knitting technique which inverts the reverse side. I also made a Superman scarf that was made the same way as
the Broncos scarf (see above)-- knit in the round, with the logo added to the ends using duplicate stitches. A designer who has a fantastic Superman
logo chart can be found here. I found the kryptonian letters on
Omniglot which is a good place for a lot of that sort of thing. I just put the letters
on a graph myself and worked with spacing and sizing according to my "number of stitches". As you can imagine, if you have ever double knit anything,
it took quite some time to complete this scarf but it was worth it in the end. Unfortunately, I had not discovered duplicate stitches when I made
the design, so it is highly unlikely that I will attempt a double-knit scarf again. I would definitely recommend duplicate stitches. This one was a
bit more rigid as well, and not as comfortable.
I made this tuque by knitting in the round and switching colors every 25 to 30 lines and then NOT sewing the ends. Tuques are essentially what you see in the old cartoons that went along with pajamas: a really long hat. In colder climates though, you will see them used as a hat and then the rest of it is wrapped around like a scarf (instead of having both hat AND scarf). I found it was very useful for my 4 year old when he was going to preschool because then he only had to remember the one extra item of clothing instead of two. Another similar concept to replace gloves, is to knit a straight needle scarf, make it about 16 inches longer and sew the bottoms up to make little pockets to replace gloves at the bottom of the scarf. That design is a bit specific though since people wear scarves a certain way and you have to incorporate their height and arm length into the design to make sure it works the way it's supposed to. If you use a loose cast off method, either side can be used as the hat portion of the tuque, with the rest of the scarf to wrap around. You can also sew up on end or taper off the end by decreasing and switching to double pointed needles to give it the classic tuque look.
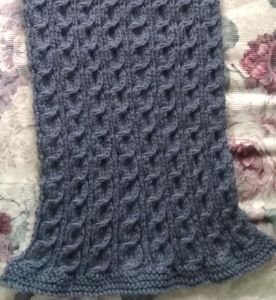
To the left here I made a table runner using cable stitch in order to make it grip the table a little better than a smoother stitch (like stockinette stitch). I also used a medium weight yarn that wasn't "soft" or "smooth" (like most of my scarves, because let's face it-- no one wants a scratchy scarf). I added the garter stitch to the bottom to give it some flair because it was made to fit a chest (he had a tv on it that was scratching the surface) and I thought it would give it a little more flair.